.jpg)
Editor's note: We're excited to bring you this series of guest posts from Shane Diller. Read on to learn more about Shane and how he approaches teaching Arduino.
Howdy everybody, if you’ve read through my last number of posts, we have covered a variety of topics:
- Ethos to coding and teaching it
- Examples of coding project/rubrics that infuse Design Thinking and Critical Thinking
- Getting started on teaching coding (without having to be the expert)
- Continuing their coding education and letting the student drive
- Marvel Studios should have cast me as Thanos instead of Josh Brolin
This post will run the gamut of coding projects - from low buy-in, quick ones, to highly involved long term extra-curricular projects. I promise my intentions are only 33.3333% showing off, the rest is to help other educators get a grasp on time requirements. Then I will give some coding technique to wrap everything up in a box with great wrapping paper, perfect wrapping job with creased edges and a bow that doesn’t fall off due to terrible adhesive. Not that I dwell on that or anything…
We’ll be starting at the low end and moving up towards my favorite coding project I’ve done with students. I’ll explain their learning objectives, time required of them, time required of you, and the payoff. All of these are projects we’ve created at the school. I’m not suggesting you copy and paste these into your classroom, but they can serve as inspiration. Bonus: these different projects are perfect for a variety of courses.
The Low End
TITLE: World History Migration Map
SUMMARY: Students studying migration of immigrant groups to the US from 1850 - 1985 tracked their movement throughout the US. They used RGB LEDs on a map of the U.S. (not one per state because wow that’s a lot!) to show the trends in time. Some years have been done with one country of origin per group of students, some years have been tracking one country of origin as a class. The LEDs must be coded by students but the maps are pre-wired and a skeleton code is provided by the teacher.
| Learning Objectives | Time Requirments for Students | Time Requirement for the Educator | Payoff and Highlights |
|---|---|---|---|
|
How immigration has been a part of the history of this country Coding a sequence of lights to represent something non-electronic |
About 4 class periods, 1 for research, 1 for handwritten map and changes, 1 for coding and 1 for presentation. This can be changed easily by the teacher by giving more or less help if time is limited. | Depending on size of maps, about 4 hours. | Students learn to convert analog (talking about it) into digital, and this can live forever and be changed easily with different populations |

Here you can see the two teachers who created the idea, test their code during a summer Professional Development hosted by the school.
The Goldilocks Zone
TITLE: An interactive demonstration of Animal Farm
SUMMARY: Students in the 9th grade English course read Animal Farm and must construct an interactive exhibit using a MaKey MaKey for others to enjoy. They are graded on how well they cite the text in their exhibit, how engaging it is, and how stable it is in terms of code and wiring. Some choose to make a quiz out of it, some choose to make a song and dance routine, some choose to employ quotes from the book.
| Learning Objectives | Time Requirement for Students | Time Requirement for the Educator | Payoff & Highlights |
|---|---|---|---|
|
Turning text into a 3D physical model that is meant to entice somebody to engage Wire and code management, turning physical interactions into digital Code that can be fixed and explained by any team member |
5 class periods with a lot of structure using SCRUM methods (team creates a to-do list, assigns tasks to each member, meets to discuss roadblocks) |
Very little during the project aside from troubleshooting. Hint: Limit them to just MaKey MaKey, incorporating other hardware like Arduino complicates exponentially |
Students learn the challenges of creating something that is meant to be touched and not fall apart. Working as a team on individual tasks where all are high failure risk is challenging but rewarding |

Here you can see the two MaKey MaKeys connected to one display. The students used Play-Doh (which is conductive) to create the characters. When touched, the Scratch code would play a recording of a quote that best represented that animal.
The High End
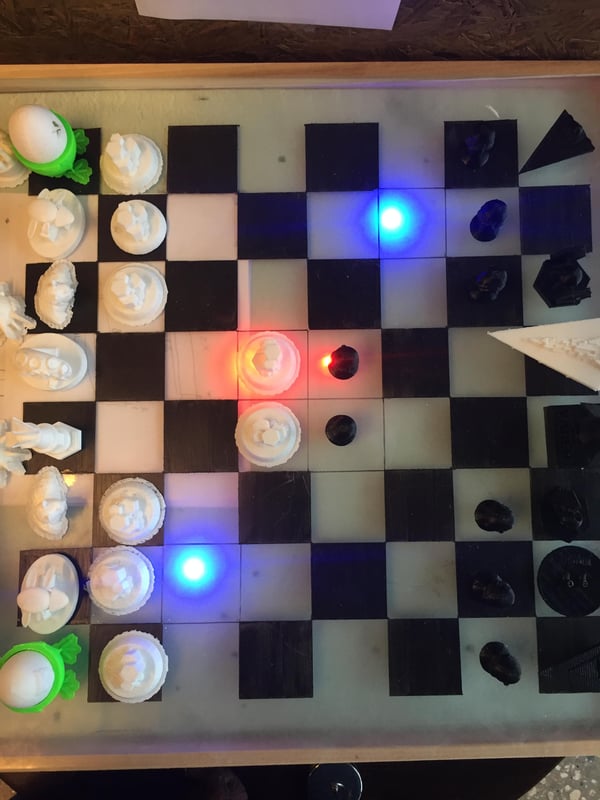
TITLE: Death Chess
SUMMARY: A group of middle mchool students spent over 30 hours creating their own variation of Chess that uses Big red buttons, 3D printed chess pieces, random chance to light up LEDs and a new set of rules that levels the playing field. They fabricated everything from scratch in teams that had to communicate through daily stand-up meetings. You can read a longer description of the outcomes, and see pictures, on my blog: Tinkerthis.blog
| Learning Objectives | Time Requirement for Students | Time Requirement for the Educator | Payoff & Highlights |
|---|---|---|---|
|
Entire process of idea to prototype. Working as a team of individual units (much like a job!) How to make sure everybody’s voice is heard, not just majority vote. |
30 hours spread out over 6 months. |
Aside from troubleshooting, surprisingly little. You must have a handful of fabricating/making skills to pitch in whenever a student is absent. |
The top tier of risk vs. reward for students is achieved here. They learn to communicate or fail. After this project, any of those I’ve listed above is much easier to pick up for these students. |
Wrap Up
As you can see, the payoff changes dramatically with time. We all know this, and although I already have very little emotional attachment to the content of my courses, this makes you question it even more. I’m not saying you all should do a 30 hour project. That is actually the opposite of why I wanted to start these posts. I’m just re-iterating that we see the best outcomes when we give the time for the project to be intentional and not a mad dash to the finish that stresses everybody out.
Lastly, I would like to talk about coding technique briefly. I had somebody email me asking about this, and it is something very important if we want to give students a taste of the “real world coding jobs.” For those who do not know what I’m talking about, give this article a read. In it, you’ll find some general themes. I’ll cover more of this later, but for right now I’d just like to say this: if you aren’t following the 10 techniques the article outlines, that is totally fine. At this stage, we are asking students to explore coding, not master it. However, we should avoid telling students to “just mess with it” or “see what happens if…” Instead, I highly recommend you tell them to “Please write down what happens when you change_____” because then students can track changes and learn from them. And, you can give them points for this! If they just play with the code, it’s like trying to untangle Christmas Lights without understanding there are two free ends that you can use to backtrack. You’re just changing random things and getting really frustrated. Surprisingly, the students that have more experience with coding, will be less interested in tracking their changes. So watch out!
Stay awesome!
Shane Diller is a biomedical engineer turned educator, all around turbo nerd and innovation geek. Shane is the Lead Technologist for the Bryan Innovation Lab at The Steward School in Richmond, VA. His favorite piece of hardware is the classic Arduino Uno due to the low price point and sheer variability. His favorite projects include any that can demonstrate high-level engineering concepts in an artistic and approachable way. He’s passionate about wearables, web development, human-centered design, prosthetics, mentoring and inspiring others, and sticky notes. Oh, and pictures of pugs in costumes.
student projects, Guest Post, programming