.jpg)
Editor's note: We're excited to bring you this series of guest posts from Shane Diller. Read on to learn more about Shane and how he approaches teaching Arduino.
Happy July 31st to everybody out there! I bring up the date for two reasons. First, we can see that the start of school is quickly approaching. I have a few weeks before the gears start turning and teachers come back, followed by students, and we all know how time starved we are throughout the school year. When I first started, I came from engineering school, and was blown away by how crucial the time before school starts is. Kind of a use it or lose it mentality.
Secondly, and most importantly, it’s my birthday! Luckily for you, I place almost no value on birthdays, so you won’t get some long winded, sappy post about how I am reflecting back on my years. Instead, I’m just happy to have cheated death for another year.

The problem with step-by-step instructions
Okay, back to the feeling of approaching doom as the school year approaches. If you read my last post, you saw how I approach getting students started with Arduino. That post was fairly straightforward and easy for an educator to grasp.
This week, I’m going to move away from that, and this approach may be slightly uncomfortable for some of you. There will be times that you won’t know the answer to the problem. Students will get frustrated, they may take that out in different ways, especially when there is a grade attached to it. Remember that we are not checking for mastery of Arduino, just like I wouldn’t ask most educators new to Arduino to demonstrate proficiency immediately. It's important to make the classroom fun and low risk for the students.
Before we get started, I should mention that I am a terrible person. I forgot to include a Code Guide that is similar to the Sparkfun Cheat Sheet for Arduino in my last post. This code guide covers basic functions and also troubleshooting steps. The troubleshooting steps and common errors slides are great for students because otherwise, they tend to opt for the “change random things and see what happens” approach.
Last time we looked at sketches 00-03, which were all guided. Today, I will give you the rest of the sketches as well as a link to one big folder where you can find them all. These new sketches are less guided and start to allow students to explore what they are learning a bit more.
The Curriculum
Sketch 04 - Love-O-Meter
In Sketch 04 students work with LEDs and a temperature sensor to create a "Love-O-Meter." Key takeaways:
- Review: Polarity, especially for the temp sensors
- Very similar to the Sketch 02, Part B
- Using loops to turn LEDs on
- Now we are combining inputs and connecting them to outputs that will be automatic and run on their own. They don’t have to be triggered by a button press
- To do that, you need to understand conditional logic
- Challenges start to move toward building something for others, not ourselves
Sketch 05 - Improved Love-O-Meter
Sketch 05 builds on what students learned in Sketch 04, but introduces RGB LEDs to create an even better experience. Key takeaways:
- Writing and calling functions
- How to “organize” your code, keep void loop light and easy to read
- How to use an RGB LED and make your own colors
- Colors with the LED often won’t look as good as colors on a computer screen
- Creating smooth transitions by changing the delay
Sketch 06 - Bright Light
In Sketch 06, we combine a light sensor and speaker to bring sound to our project. Key takeaways:
- The similarities and differences between a light sensor and temperature sensor
- You can use the “level” of any input to change the level of any output
- How to calibrate a sensor to an environment, and why you should do so
- Creating sound with Arduino can be very complex
- Cheat sheet for most basic sensors and what connections are needed
Sketch 07 - Simplifying Buttons
Sketch 07 introduces a simpler way to connect buttons and introduces switch cases.- Key takeaways:
- Using onboard resistors to reduce the amount of work in building circuits
- How to make a button create a “persistent state” - doesn’t end when button is released
- How to use these different cases and states to do different things and change variables
Sketch 08 - Making Things Move
In Sketch 08 we get to start making things move by incorporating servo motors. Key takeaways:
- What is a servo motor, what are its uses?
- How to use a servo motor with an Arduino board
- Using a different “library” of servo specific functions - different methods for doing things
- How to attach things to servos and create different types of motion
The Breakdown
As a reminder here is the rubric that I mentioned in the last post. Notice that you are checking off students as they complete challenges. That means you can walk the room and offer some advice.
Let’s start with the lack of troubleshooting slides:

You’ll notice I give the code files at the beginning of the challenge and not the end now.
You can give students troubleshooting files if you’d like, but by this point, they should be able to start to troubleshoot on their own. Note, I only said "start". This is where we start to remove the training wheels. A lot of the success of this depends on your classroom culture. I won’t go over the challenges slides as they are covered in the last post. However, these challenges will be more difficult and require the student to explain why they made the design choices they did.
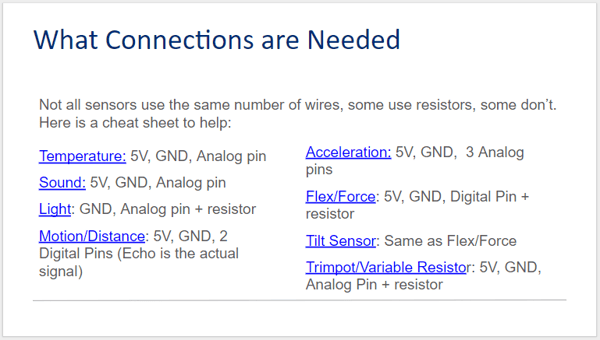
This slide is at the end of Sketch 06 - What’s that bright light. This is a cheat sheet to what connections are needed and a hookup guide.
Lastly, here is the link to the big ol’ folder of Arduino slides and code files.

Next post - fun but also high quality projects and coding technique!
Shane Diller is a biomedical engineer turned educator, all around turbo nerd and innovation geek. Shane is the Lead Technologist for the Bryan Innovation Lab at The Steward School in Richmond, VA. His favorite piece of hardware is the classic Arduino Uno due to the low price point and sheer variability. His favorite projects include any that can demonstrate high-level engineering concepts in an artistic and approachable way. He’s passionate about wearables, web development, human-centered design, prosthetics, mentoring and inspiring others, and sticky notes. Oh, and pictures of pugs in costumes.
Arduino, teaching tools, getting started, Guest Post, programming, helpful information, computer science, STEM