.jpg)
Happy New Year and good tidings and all of that other stuff people typically wish you! I don’t know about anybody else, but my least favorite thing about the New Year is the constant question of what I did on my break. I need to just make a shirt that says “Didn’t do anything except gain weight and check Instagram until I got bored, then opened Twitter.”
I always make grand plans. This year it was something like this:

But as I’ve said before, a modest delivery is much better than a grand proposal. And my delivery is quite modest. I’m going to take us back to the “Hello World” of Arduino. For those of you not familiar with “Hello World,” it is typically the intro or starter code that somebody will first see when learning a new language. And typically it involves writing some code to print out “Hello World” on the screen.
Blink Sketch
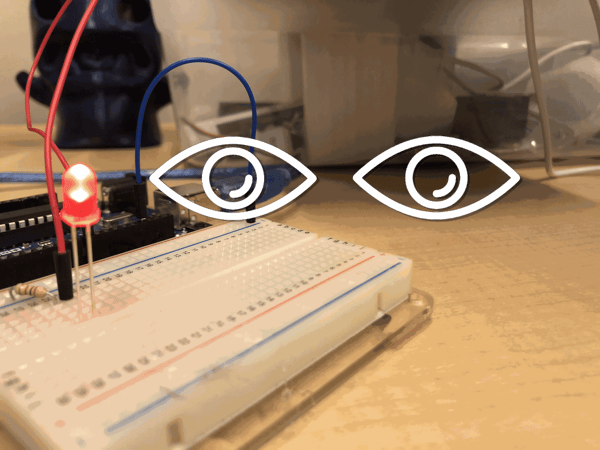
When first learning Arduino, we start with learning to write code that blinks an LED, called the “Blink sketch”. A sketch in Arduino is just a saved program file. If, like me, you have taught many teachers and students Arduino, you have opened the Blink sketch hundreds of times. It may even haunt your dreams in some kind of weird way where endless windows of the sketch pop up and you can’t close them fast enough. Not that I’d imagine a scenario like that….and then create a gif of a scenario like that….

Blink blink blink blink! Tell me in the comments how many times you’ve run through this with yourself or others.
This lesson won’t actually make you a better coder through fundamentals, even though every movie and book about skill always highlights the importance of them. But we can use this intro Blink sketch to teach the anatomy and physiology of the eye!
This is a great way to use coding and computer science (CS) to do more than just teach your students how to write basic code. I always try to work with teachers to help them realize that coding and CS shouldn’t be taken at face value.
When we teach code for the sake of code, we really miss the target. It’s just like teaching math without ever using real world examples - it gives rise to people who claim to just “not be a math person” which we know isn’t an actual thing. IF you disagree, please go ahead and see this post of mine about why you’re wrong.
How Fast Can You Detect?
So, let’s talk about the LED. Almost every first project involves learning how to control the rate at which an LED blinks. Changing the delay will change how quickly the loop runs (how quickly the LED turns on and off). If you bring the number in the delay command down to somewhere within 8-13 milliseconds, you will eventually not notice the cycling of the LED, it will just look like the LED is constantly on because your eye can’t detect how quickly it is turning on and off. When I run this exercise with people, I ask them to find the lowest number at which they can just barely detect the “blink.”
This is where things get interesting.
Before we move on, you need to try and do what I just described. If you’re already familiar with setting up and running the Blink circuit and sketch, you can skip the section below. If this is your first time using Arduino or you’d like a refresher, please see below for instructions.
========================================================================
If you’re familiar with setting up a Blink sketch, you can skip this part
Quick parts list:
- 1 Arduino uno/Sparkfun Redboard
- 2 jumper wires
- 1 resistor (110-330ohm range)
- 1 LED of your choice
- 1 USB cable to connect them
Set up your blink circuit. See below for a circuit diagram.

Grab some code from the link above, copy and paste into your Arduino IDE and choose your port. Here’s a quick Youtube video I made using Screencastify to show you how. While this video doesn’t explain what the different bits of code do, you can find plenty of other resources out there to explain that.
========================================================================
As you put in different values between 8 and 13 for the delay, it is okay if you see some wavering of the LED, or what looks like small little blinks. It doesn’t have to look completely solid. I’ve used 11 for my delay and I can still see a bit of a flicker but not distinct on/off periods.
Now comes the fun part! Look at the LED straight on. Not quite as close up as this image but you get the idea. From here, you shouldn’t notice any blinking, or perhaps just a tiny tiny tiny bit of flickering.

Now, look at some point about 6-8 inches to the left or right of the LED where the LED is still in your peripheral vision. Give yourself a moment to adjust. Stare straight ahead. You should start to notice that the LED is blinking!
What Does It All Mean?
This demo actually shows the different types of vision and what they are mainly responsible for! Whenever we think about our “vision” we typically equate that to whatever we are trying to currently focus on. This is typically referred to as “Central Vision” and has a number of characteristics that we use everyday:
- Responsible for recognizing letters, facial features, etc.
- Can detect very fine spacing between two points or letters
- Very good at detecting colors and differences
- Where both eyes overlap, we get depth perception
- Only responsible for about 3° of our visual field when intensely focusing
Then we have our Peripheral Vision which is responsible for:
- Filling in the rest of the “scene” for visual cues about where to look next
- Night vision
- Motion detection
So by changing the delay to a very small number, we can see where our central vision and peripheral vision differ.
Depending on your district/personal belief system - This peripheral vision is what has evolved to keep us safe and detect any predators or threats that might be sneaking up on us. This peripheral vision is supposed to kickstart our fight or flight reactions by perceiving a threat before it’s directly in front of us. The central vision is what we need for reading, recognizing discreet parts, etc.
You can choose to end the lesson here if you’d like. This does a decent job at explaining the different types of vision and how we can use a bit of code to demonstrate them. The part below takes a much deeper dive into eyesight, and other factors that influence our ability to see. Be warned, there is deep nerd-ery ahead!
But Wait! There’s More!
So, you might be asking yourself, how does the delay rate come into this? If central vision can still detect motion but peripheral vision is better, why can my central vision suddenly not detect that motion? Two reasons! 1) Rods and Cones and 2) Framerate
Rods and Cones
Much like a light sensor or photoreceptor you might buy from SparkFun, the back of the eye also has photoreceptors. However they have two distinct shapes - rods and cones. Our Central Vision has mostly cones with some rods. (Except the fovea, which is our real, true central vision - it has no rods at all.) The Peripheral vision has more rods, which are responsible for night vision and detect motion much more easily. Two types of sensors to do two different things.
Framerates
If you’ve been around computers for a while, you’ve heard of framerate as the rate at which your screen refreshes. If you’re a hardcore gamer, you’ll know that that the more taxing a game is on your processor, the slower the framerate. Slow framerates makes a video sequence look choppy, and almost like poorly done stop motion animation.
But here’s the cool thing - our eyes also have a framerate. I remember when I first found this out in one of my Biomedical Engineering courses - I was blown away. I never thought that my eyes had to “refresh” the image in my brain - I just assumed they were always “on.” But it turns out that even our perception of motion is just a series of images put together by our brain to recreate how the thing we’re watching actually moves.
Our eyes even move in a series of small movements instead of a fluid motion. They’re called Saccades or Saccadic movement and look like a series of stairs or square waves. When we read text, we don’t move smoothly, our eyes “jump” to each word. Below is a demonstration of the jumps and the relative time we spend on each word. For anybody confused why the graph moves upward, the unseen y axis would be position on the page from left to right

Source: lookingforlearning.com
Now, there is no single number for the framerate of the eye, but it is generally accepted that our eyes refresh at a rate of 60Hz. This frequency translates to 60 times per second. Which means our eyes refresh about every 16.6666666666666667 milliseconds.
Connecting the Dots
Now let’s think back to what sparked this conversation - the blinking LED. If you remember, our delay was somewhere between 8 and 13ms. If we add both delays (one while the LED is off and one while the LED is on) together - we get somewhere between 16 and 26ms total for a cycle - not accounting for the actual time to run each command and refresh the loop.
This is why our delay has to be somewhere around here for this experiment. Any higher and your central vision will be able to detect the blinking. Too much lower than 8ms and you won’t even be able to detect it with your peripheral vision.
Another awesome way to perceive this is to use the Slo-mo mode on your phone. My students discovered this one actually. Without even filming, the Slo-mo mode will slow down the blink that we typically can’t see and you’ll be able to see the blink happening.
Here’s a little video I put together to demonstrate this. (Ignore my gross hands, please and thank you.)
Vision Fun Facts
Here are some cool facts to wrap things up!
- Humans can actually perceive framerates as high as 1000fps - but not make sense of them.
- Fighter pilots have been able to see a plane in images as fast as 1/255th of a second which is about 4ms.
- Humans can still use 24fps to see motion - it doesn’t have to be 60fps.
- In the 1950s, there was a big scare that advertisers could use “subliminal messaging” by inserting an image so quickly (around 1/300th of a second) in a film that only our subconscious would notice it. It was called the “Popcorn Effect” after a researcher used it to try to increase Coca-Cola and popcorn sales. It was later found out he falsified his results.
- In the 2000 Bush v. Gore election there was a pro-Bush campaign ad that many claimed used subliminal messaging. In the ad, the word bureaucrats is used and many claim that the word “RATS” flashes on the screen for about 1/30th of a second. It sparked controversy but is not believed to have affected the outcome.
Let this serve as an example of using CS in the classroom to help spark a lesson and give some context to what we teach. This is obviously a very specific lesson, but one that I found semi-accidentally. In reality, I teach this lesson just as I’m taking students through the basics of Arduino and cover this phenomenon in about a 5 minute tangent. I don’t discuss rods and cones, or the subliminal messaging scares, or saccades. But I wanted to provide that for you.
Student Takeaways
Lastly, I’d like to take some time to describe in detail the student response to this exercise. As many of you know, some students think CS is boring or too hard and not exciting. This lesson is specifically to get them curious as it requires very little actual CS work and there is a large payoff -- many of them like to compete to see how “good” their eyes are. Other takeaways and lessons learned are:
The good:
- If you are tight on funds, you can use one Arduino to demo this and then have students work in a digital arduino like TinkerCAD Circuits.
- In my class, I allow students to have their phones and many take recordings in slo-mo of the LED. But if you’re in a class or school where that isn’t allowed, just get a dongle that connects your phone to the screen so you can ask them to look at the LED and then look at the screen to see what the phone picks up.
- You can construct experiments from this to determine if this experiment is an accurate measure of visual strength compared to somebody’s actual visual test scores at an eye doctor. (Is detecting a faster blink proof that your vision is superior to others?)
- Provides a great jumping off point for a number of different subjects:
- Use this to discuss psychology of Subliminal Messaging and how to source/fact check and the importance of peer review based on the doctor in the “Cool Facts” section lying about their data.
- You could use this in a History class if talking about factors affecting political elections from 1956-2000
- This can be a starting point lesson for Physics classes learning about Light, Anatomy classes learning about eyes or the structure/function and Biology classes learning about systems
- Connects to standards!
- ISTE Standards: 2.a.i, 2.a.vi, 3.a.i, 4.a.i
- NGSS Standards: LS1-1, LS1-2, LS1-3, LS1-8, PS4-2, PS4-3, ETS1-4
The not so good:
- This further cements student’s understanding of the delay function but they often still forget the other function that actually turns on the LED. (Can you remember what it is??) (The answer is digitalWrite()!) That part I’m still working on.
- This only gets the resistant students excited for about one class, then they tend to return to a fixed mindset about CS.
As always, I hope you all find it useful. Find me on twitter to ask any questions.
Stay Awesome!
Arduino, teaching tools, getting started, computer science, STEM