
I recently visited my daughter's first grade classroom to deliver a mini paper circuits workshop. We had tons of fun, and I thought it might be helpful to share how it all came together.
Before we get started, I want to acknowledge @gella, a product manager here at SparkFun, for her in-house workshop and easy-to-follow tutorial...without either of these, I would not have had the confidence or inspiration to do this. I also want to thank my daughter's teacher, Michelle, who helped turn this into a multimedia, cross-discipline lesson.
1. Gathering Materials
- Electronic Components: Here is my wish list of SparkFun materials needed for this lesson. The wish list includes (be sure to get extras of everything!):
- LilyPad Button Board
- Coin Cell Battery – 12mm (CR1225)
- Copper Tape – 5mm (50ft)
- LED – 3mm Cycling RGB (slow) Note: If I did this again, I would probably use a slightly larger (5mm) LED for a brighter light; the template will accommodate this.
- Other Materials:
- Card stock – white
- Card stock – solid colors
- Transparent tape
- Stickers and markers for decorating the cards
- Video Support: Michelle (teacher) found a video on BrainPOP, "Electric Circuits." It was absolutely perfect for the workshop.
- Parent Helpers: Michelle was also able to organize parents and older students to help with the workshop, which was very important.
2. Prepping Materials (Don't Skip This Step!)
Much of the prep was done to save time and to make the activity easier for little fingers. If this workshop were for older kids, I would have had them fold their templates and cut the copper tape. Visit the easy-to-follow tutorial from @gella for comprehensive instruction.

- Print onto the card stock with the template (I used the pixel-heart template, but others are available)
- On white card stock print the circuit
- On colored card stock print the heart
- Prepare the pixel-heart template: To save time, I went ahead and prepared the pixel-heart template ahead of time:
- Cut it out: I was lucky to have a laser cutter to do this step; you can also use an X-ACTO® knife.
- Pop it out: This is a pop-out card, and it can be tricky. I used a pencil to pop out each fold.
- Fold the templates in half like a card.
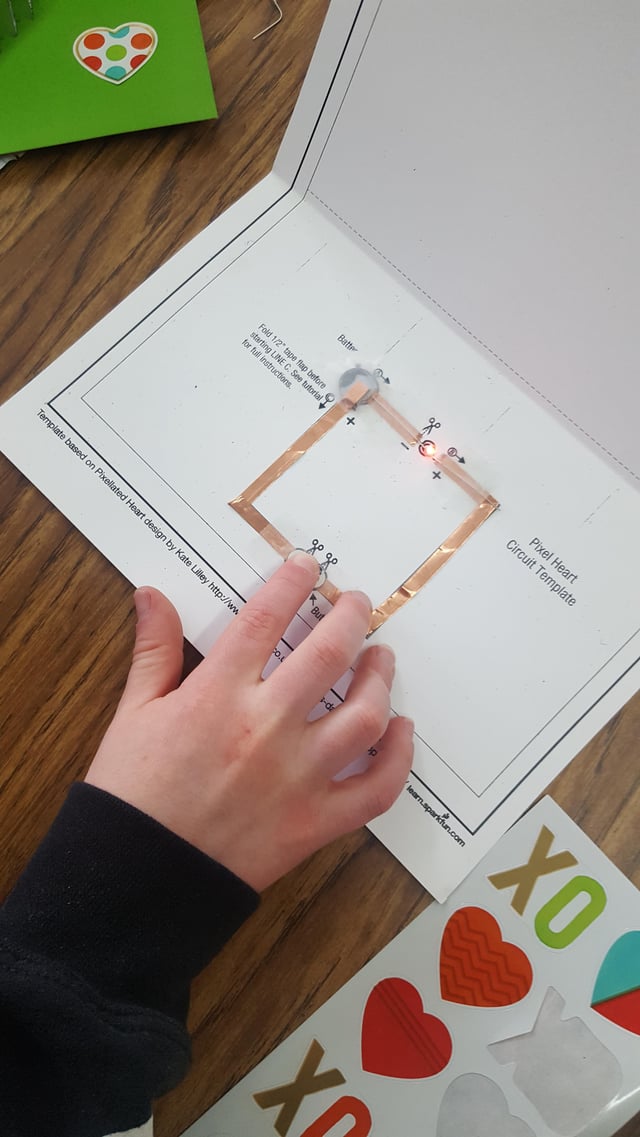
- Cut the copper tape into pieces to match the template. You will notice the circuit template has been labeled "A," "B" and "C." This corresponds to three pieces of copper tape. I went ahead and cut these and separated them into different containers for easy identification. Please also note that one end of "C" will need to be folded back; doing this ahead of time will make everything easier.
- Test the batteries and LEDs: Quickly squeeze the two legs of the LED on each side of the battery (the long leg goes to the positive side)...if the light goes on, both the battery and the LED are working!
3. Delivering the Workshop in 8 Steps
This format seemed to work in terms of engagement. We split the class into five groups and were lucky enough to have a parent or older-student helper at each table (this was critical!). Here are the eight steps of our lesson:
- Introduce Goals:
— Build an awesome light-up card
— Learn how an electronic circuit works - Assess Current Knowledge: Ask students what they already know about circuits to assess current level of knowledge; you might have the opportunity to introduce key terms: power source, conductor, load, switch, etc.
- Video Overview:
— We used BrainPop, "Electric Circuits," which requires a subscription. For older students, SparkFun's, "What Is Electric Current?" video would work well.
— Check for Understanding: After the video, we reviewed the four components of a circuit (power source, conductor, load and switch) and looked at circuits in the classroom. We quickly took apart a flashlight to examine how it worked. - Overview of Project/Materials: We reviewed all of the materials and looked at an example of the final product.
- Build the Circuit:
— Do the copper tape first:
a. Pass out the white card stock with the circuit template and the copper wire for "A." Have the students affix the copper wire.
b. Pass out "B" coppper wire and have the students affix "B."
c. Pass out "C" copper wire and have the students affix "C." One end of "C" should be folded back on itself; this goes over the circle/where the battery will go.
— Now move to the other parts:
d. Pass out the switch. Have students tape the switch to the circuit where indicated on the template. This will take two small pieces of tape — one on each side. Be sure each side of the switch is touching the copper tape.
e. Pass out the LEDs. Have students tape each leg of the LED to the circuit as indicated on the template. Be sure the positive/long leg of the LED and the negative/short leg of the LED are in the right location and firmly affixed to the copper tape. I bent the wire to make it fit better.
f. Pass out the batteries. Have students tape the battery on using the transparent tape. It will go on top of copper tape "A," while copper tape "C" will go over the top of it.
g. Press the button...SUCCESS! Or troubleshoot the circuit. We did lots of troubleshooting. Here's a pic:
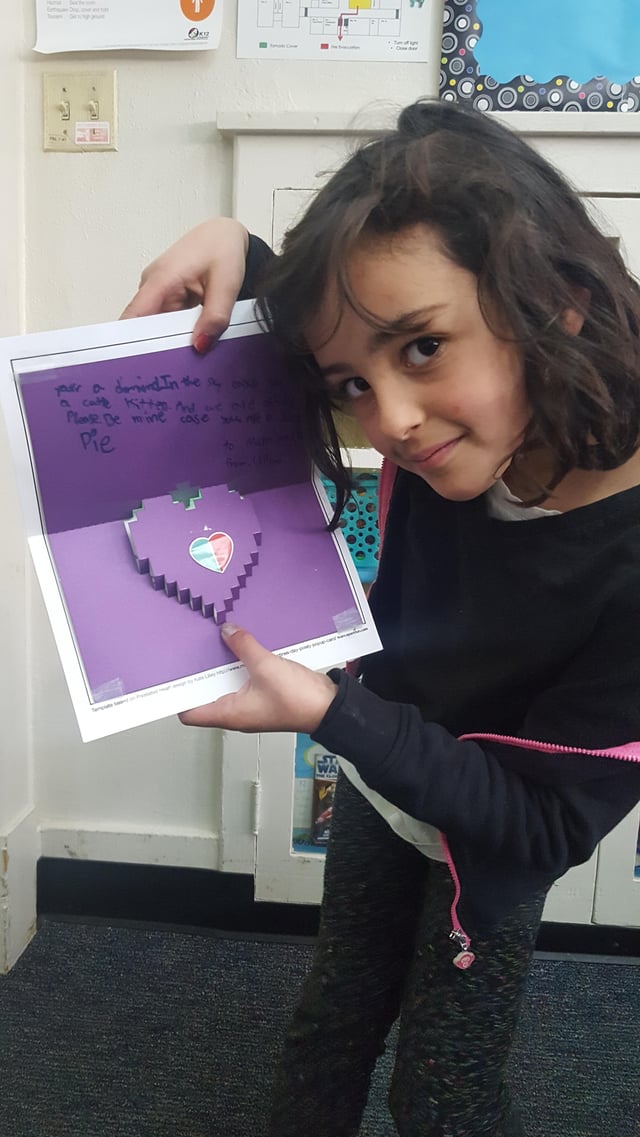
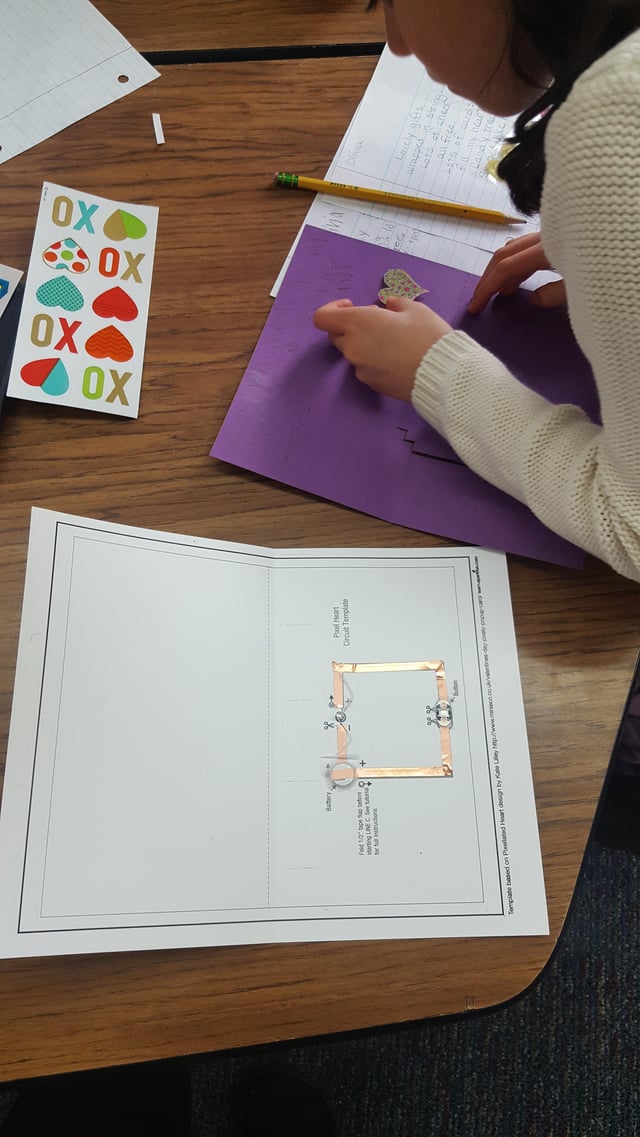
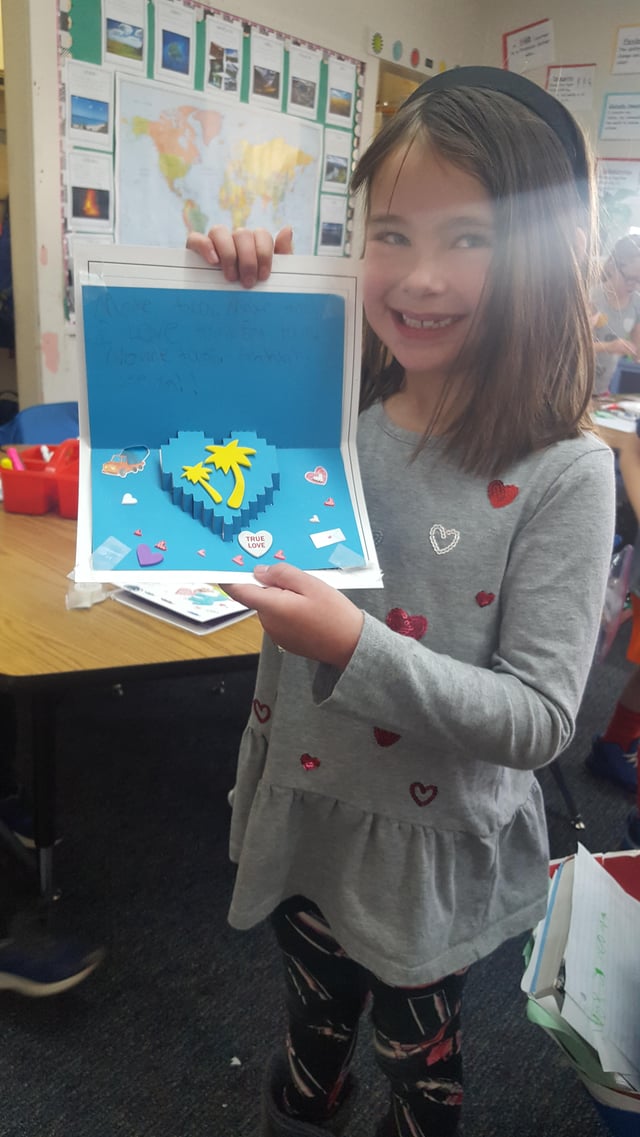
6. Construct the Card: Place the pre-folded pixel-heart template (colored card stock) over the circuit and tape. It should fit perfectly to allow the light from the LED to shine through the pop-up card.
7. Decorate: Encourage students to make the cards their own with decorations. In this case, Michelle (the teacher) used this as a culminating project to a poetry-writing lesson. Students wrote their poems in the cards and then decorated them...making this a fabulous cross-discipline project.
8. Debrief and Review:
— Debrief: Take this opportunity to talk about some of the challenges the students had to overcome. The students in this class said things like: "The battery did not work" or "I broke a leg off my LED" or "My switch was not touching the copper tape." This is a great lesson around being able to troubleshoot to make things work.
—Review: Revisit the key concepts of a circuit, including the four main components: power source, conductor, load and switch.
4. Reflection
This was a very good morning. In total, it took about 2.5 hours. The parent help and teacher collaboration were essential components of success. It definitely felt as though we were successful in teaching students what a circuit is and providing a hands-on way for them to experience building one. The kids seemed super motivated and happy with what they made.
Want to make paper-circuit cards in your classroom? Check out this detailed tutorial.

Have a fun activity involving paper circuits? Please share in the comments below!
paper circuits, Maker Education, basic circuits, STEAM