
My work on CPR was motivated by my personal experience. When I was eleven or twelve years old, my dad told me that he lost his father when he was around my age. This surprised me because it never occurred to me that my father was so young when it had happened. He told me that my grandfather had passed away due to cardiac arrest and how everyone had helplessly stood around him. Perhaps cardiopulmonary resuscitation (CPR) could have saved him. This made an impression on me.
The Need for A Low Cost CPR Simulator
Every year, 350,000 people get cardiac arrest in the US. Out of these people, only 8% to 12% people survive. For most people who suffer cardiac arrest at home (90%) or hospitals (10%), the most immediate care is CPR. CPR is performed by compressing the chest by hand at a high force, rate and depth.
The American Heart Association (AHA) has provided strict guidelines on how CPR must be performed. However, most people, including 60% of trained professionals, find it difficult to perform CPR accurately, reducing its efficacy. Today, in the US, almost 40% of people know how to perform CPR. However, this number is very low in developing nations. For example, in India, only 4% of people know how to perform CPR.
CPR training is carried out using a mannequin-based simulator. Good simulators that give objective feedback generally tend to be very expensive and can cost anywhere from $3,000 to $60,000, while most of the common CPR dummies provide no feedback.
That is when I got the idea of developing a low-cost simulator which can provide accurate feedback to the trainees and can be used anywhere in the world.
Developing a CPR Simulator
At that time, I was learning to use Raspberry Pi, but I did not know where to start. One day, I saw the SparkFun Inventor’s Kit on the SparkFun website, which I then purchased. Over the next couple of months, I went through several tutorials and had a lot of fun making cool devices using the SparkFun Redboard (Arduino Uno). Very soon I was designing my own CPR simulator. I used a moon shoe, which consists of a box with a number of thick rubber bands on the top which gave the sensation of compressing the chest.

The Redboard allows interfacing and control of several sensors. To measure the force involved in CPR, I used a FlexiForce sensor. The piezo buzzer was used to provide 120 beeps/minute. I started with the sample code that came with the SparkFun inventor’s kit, which I modified to develop the algorithm to measure if the CPR was successful or not.
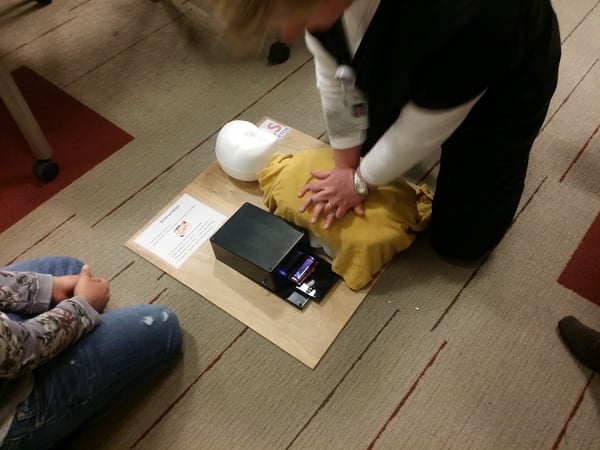
Testing the Simulator
After completing my simulator, I took it to the Jump Simulation and Education Center in Peoria, IL where seven nurses and CPR instructors tried out the simulator. Their feedback was encouraging: 28% said it was excellent while 72% responded that it was very good. I have also been working with engineering students at the University of Illinois to improve the design to make it more robust.
In 2016, I submitted my invention to the Discovery and 3M Young Scientist Challenge and I was pleasantly surprised to be selected as one of the ten national finalists. Since the competition, I have created a website called cprsaves.org. In this site, I have uploaded the complete blueprint of my simulator, along with the material, circuit, and link to the software code. You can also see a video of my CPR simulator. I hope you can use the design to make your own simulator or make one which is even better than mine!
Mrinali Kesavadas is a Junior at the Mahomet-Seymour High School in Mahomet, IL. She is a member of the Science Olympiad team and WYSE team. Mrinali loves playing the piano and tennis. She is also the founder of cprsaves.org
student projects, helpful information, STEM