
As we have worked with teachers using the micro:bit more and more over the past year, we have seen amazing projects across different subject areas. Teachers are the smartest… digital high-five!

One of the biggest places we have seen adoption of the micro:bit has been in the science classroom, more specifically data collection and logging. In this two-part blog post series, we will look at two scenarios that will help students and teachers to collect data in authentic and scalable ways, depending on the period of time needed for data collection, as well as the need to be remote (and how remote).
Serial Data Primer
To start, we will be using serial communication through the UART on the micro:bit. Serial is nothing new – old printers used to work on this same communication protocol, and many products and widgets we build and sell use it. Most microcontrollers have at least one UART, so this concept can be used across a number of different controllers.
Serial UART uses four pins: a Receive (RX), a Transmit (TX), Ground (GND) and Power(VCC). On the micro:bit we can use a number of pins as UART pins, but we will use pin 0 in this example for our TX pin. With a pin set, we also have to talk about baud rate, or the number of bits per second two devices will communicate with one another. Both devices need to be set/configured for the same rate, otherwise data will become garbled and unreadable. For the most part, the standard baud rate is 9600 bps, but 115200 bps is used a lot as well. In fact 11520 is the standard UART baud rate for the micro:bit.
Once RX and TX pins are established, you can connect two devices by connecting the TX of one device to the RX of another and the inverse as well (RX to TX). Now the two devices can send information such as numbers, strings and characters, as well as react to the data they receive.
For more general information on serial communication over UART, please check out this hook up guide tutorial and this one on reading serial UART with a terminal with your computer. But for now, you have enough basic knowledge to play with serial communication on the micro:bit
Long-term: Program it and leave it!
Now, back to using serial communication with the micro:bit. The micro:bit is probably one of the easiest microcontrollers to start to play around with in terms of using a UART. In this example, we hook up our OpenLog to the micro:bit and send data in the form of a string to be saved as a text file on a microSD card inserted into the OpenLog. To learn more about the ins and outs of the OpenLog, take a look at the hookup guide. The application point for the OpenLog would be a data logging project that is left in a remote location, running off a battery for an extended period of time. A great example of this would be monitoring temperature and light changes over the course of a couple days or a week. How often data is collected if up to you, but for our example, hourly or every 10 minutes will work fine.
Hook-up
To hook up the OpenLog to the micro:bit we use three wires:
- VCC connected to 3.3V on the micro:bit
- GND to GND on the micro:bit
- RX to Pin 0 on the micro:bit

That’s it! Now, insert a microSD card into the OpenLog. To program the micro:bit to talk to the OpenLog, open your browser to MakeCode. Using Microsoft MakeCode, we will create a basic program that sends a comma-separated string of data consisting of two data points (light and temperature) to the OpenLog over Serial UART.
Programming micro:bit
On Start Block
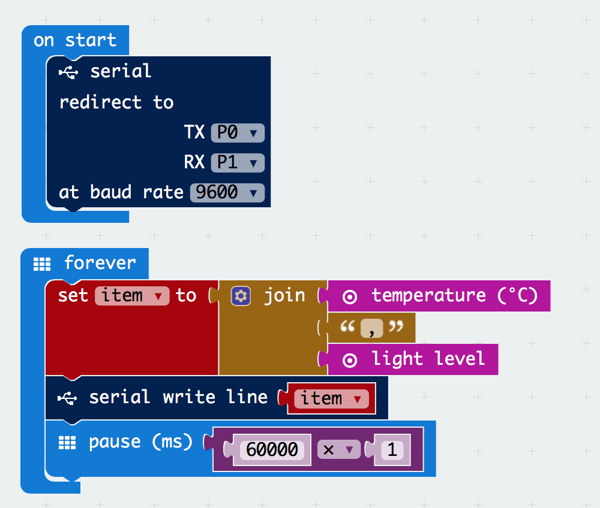
Let’s take a quick look at what makes this program so special. First, the On Start block. It only has a single block in it, but it is probably the most important. This block is the Serial Redirect block, which allows you to configure different pins as RX and TX, as well as set the baud rate of the pins. In this case, we want to transmit to the OpenLog over Pin 0 at a baud rate of 9600 (standard baud rate for the OpenLog). The pin numbers and baud rate are all configurable, so if you are already planning on using something on pin 0, you can switch to other pins available on the micro:bit.
Forever and Join Blocks
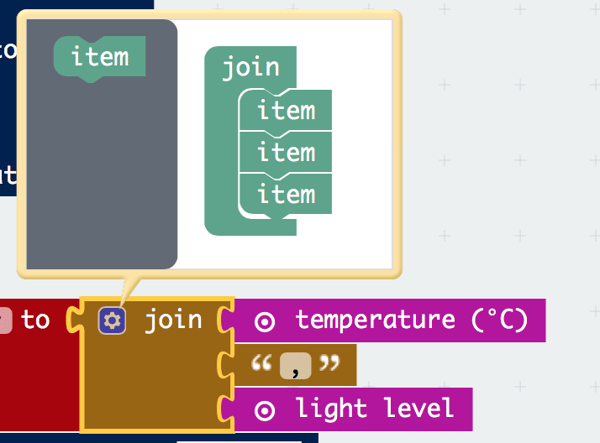
In the Forever block, we collect the data points we want to measure and join them together. The Join block does just that – it joins pieces of data into a single string. To add more spaces in the Join block, click on the gear icon and drag more items over to Join to create more space.
We have three spaces: one for the temperature of the micro:bit, one for a comma and one for the light value from the light sensor on the micro:bit. The Join block joins these three pieces of data into a single string that would look like “25,75.” This string is then stored in a variable called “Item.”
Next, we write that string over the serial lines as a single line. MakeCode helps us out and tacks on a newline character at the end of the string (same as hitting the Return key on our keyboards).
Finally, we tell the micro:bit to wait one minute or 60,000 milliseconds x 1 before doing it all over again. To change the period of writing, you can increase the multiplier of 60,000 to how many minutes you would like between readings.
Now, if you install this program onto your micro:bit and have everything hooked up correctly, let it run for a few minutes, then remove the microSD card from the OpenLog and insert it into your laptop. There should be a log.txt file on it. If you open up your log file, you will see pairs of data separated by a comma with each pair on its own line:
21,56
45,79
23,45
12,29
You can now use this file as is, or import it as a .csv file into Microsoft Excel or Google Sheets for further analysis.
Pretty sweet! What will you log with your new remote data logger? You are only bound by the battery life of your micro:bit and/or the size of your microSD card.
Next week we will explore the next-level application of using Serial communication. We will be using two micro:bits to datalog - one as a remote sensor talking with the second over radio. They will be connected to your laptop or Chromebook, so you can view the data in realtime over a serial monitor app in the Chrome browser. I know, it sounds technical, but trust me, it’s easy to setup and it’s scalable. It will change your world when it comes to collecting data in your classroom. Until then, check out the OpenLog and how to use it with the micro:bit. Let us know how you plan to use it through the comments on this post or on Twitter.
Check back in a few weeks for Part 2 – Short-Term, Real-Time Radio to the Rescue.
micro:bit, programming, microcontroller, helpful information