
This is a quick guide to using an old Arduino Shield called the Musical Instrument Shield. It gives your Arduino the ability to play a whole series of different notes and instruments — just like an old Casio synthesizer keyboard! We have a great tutorial on using this board that was written some time ago. I wanted to revisit this board, so I created a quick, fun project using the tutorial as an example.

For this project, you'll need:
- SparkFun Music Instrument Shield
- Stackable Headers
- SparkFun RedBoard for Arduino
- Solderless Breadboard
- Five Push Buttons
- Speaker
- (optional) Serial LCD and JST Wire Connector
Click below for the complete wish list of parts used!

Hardware
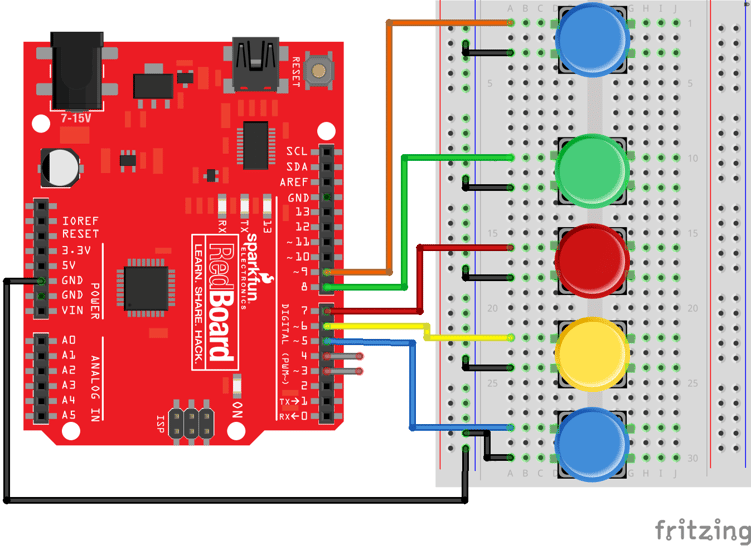
The wiring for this circuit is pretty simple. The diagram below does not show the Music Instrument Shield, but when it's stacked on top of an Arduino, it uses pins 3 and 4 — so stay away from those pins. Pin 3 is used for data communication to the MIDI chip, and pin 4 is used to reset and sync the chip.
Connect the five push buttons as shown in the diagram below. In the code, I use the pinMode(##, INPUT_PULLUP) functions to eliminate the need for external pull-up resistors. As an optional add-on, I have written into the code example to use a Serial LCD and a JST 3-Pin Jumper to display the four notes that the device is set to play.
Code Example
Click here to download the code example from my GitHub repository. The Music Instrument Shield takes serial commands on pin 3 at a data rate of 31,250 bits per second. Data is passed from the Arduino to the Music Instrument Shield, instructing it to configure instruments and play notes.
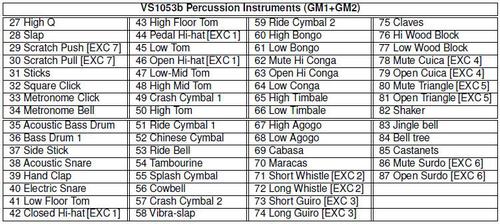
The Music Instrument Shield has a lot of different functions. In this one, we're setting it to a bank of sounds that are tied to drum beats and special effects. This is on line 57 of the code.
After we've configured this, we are going to read the four button presses and play one of four notes on the shield. When we press the fifth button (connected to pin 9), we increment the notes that are being played. Based on testing, I found that you can play the notes indexed from 27 up to 87. The code is yours to tweak and modify. Play around with different numbers or instruments. Below is a table of the notes that we play in this example.
Want to learn more? Check out the quickstart guide for the Music Instrument Shield!

Demo
Here's a quick video demonstrating how the whole thing works. I love making "music" and sounds with the Arduino! It brings back memories of playing with my old Casio! Next project is to do some quick recording and playback. Have fun with this and share your ideas in the comments below.
Arduino, teaching tools