.jpg)
Welcome back! Today we will be diving a little bit deeper into Design Thinking (DT) as a tool for your students and a way to pump up the creativity in your classroom. Last time, we looked at the rationale for using DT, what it is in a limited scope, and how I use it in my Assistive Device class project. I’ll be handing over chunks of my presentation I use to teach other educators about DT as we go. This first chunk recaps what I covered last time and dives a bit deeper into the research phase - Discovery. Check it out here.
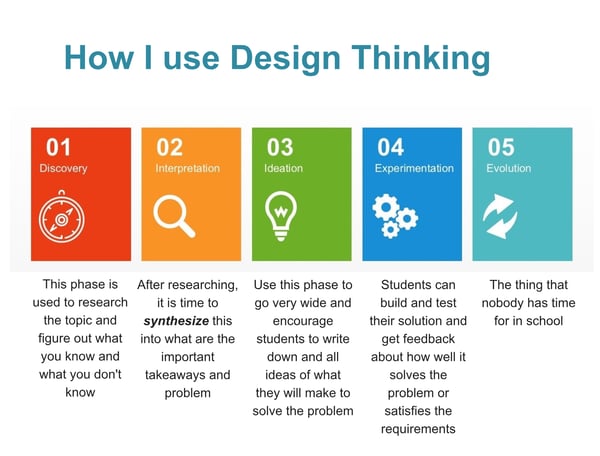
As a reminder, I used the picture below to give us some details, about what each step of DT entails.
This post will cover a bit more about Discovery as well as move into Interpretation. I feel it’s very important to get the Discovery phase right because it sets the groundwork for all of the other work you do. I could easily spend 6 hours with students doing research and asking questions and doing more research but I’ll warn you now - many students think that 1 hour of research is more than enough for them to become experts. It’s our job to let help them navigate that correctly. They are trying to construct a stakeholder map, or working map, of how things affect each other and affect their problem.
Building a Stakeholder Map

When starting out, they may think there are just a few points of interest to research. But we know there are many many more! Left Photo Credit. Right Photo Credit.
Shoutout to Fallout 4 because that’s what I’ve been obsessed with lately and it gives me a great analogy. Your role is to help guide them and ask “Well how does X affect that?” and “Have you looked into Y?” and “Why is that true of Z? Why? Why? Why?”
Many students will take answers from the internet at face value and this pools their knowledge on the surface. This information is useless.
By asking "why?", we start helping them construct a web of connections to better understand the subject/problem they are researching. Constantly asking them “Why?” forces them to think deeply about something. There’s even an exercise you can do called the 5 Why’s. Try it and see where you end up. No matter what, it forces reflection and analysis, not just taking notes. Kind of a “regurgitation vs synthesis” kinda thing if you’re into that type of ~*education talk*~.
Another way to do this is the stakeholder map, found on slide 26 of the Google Slides. A stakeholder is modernly thought of as somebody who owns stock in a company. But traditionally, it is anybody that stands to benefit or suffer from a company doing well.
Let’s make up a company that sells diabetes test strips. Some examples of immediate stakeholders would be patients, nurses, doctors, caregivers, and employees. A bit further out are the regulatory authorities, competitors, families of patients, manufacturers, and researchers.
Identifying these stakeholders is a way of viewing a problem or topic from different angles/lenses. The company doesn’t actually matter; when doing this as an exercise, the company is replaced by the problem/topic at the center of the page. So instead of a company that produces diabetes test strips, the problem/topic might be “Self testing with diabetes test strips.”
The purpose of a stakeholder map is to identify what is most important to the stakeholders and make connections between them. And this can only be done after researching.
One last thing of note, you can have a customer stakeholder and a user stakeholder that are not the same person. The clinic or caregiver may purchase the test strips (customer) but they aren’t the one using them (user).
Okay, let’s pause for a break to check in. You may be thinking, “Great, sounds good! But...what is the purpose of this? Shouldn’t I just have them focus on one stakeholder without constructing a map they largely won’t use?”
Honestly, I’m not going to tell you that you’re wrong. For the Assistive Device Project, I have them focus on just the user/patient with limited hand mobility. I tell them not to worry about others, just to focus on how a disease like Parkinson's affects a person. But, if you do want to take this deeper, students will be able to speak to this problem in a big picture way after a Stakeholder Map exercise. And, you can still do the Stakeholder Map and research all in one class period. It’s totally up to you.
Interpretation
So, great you took a class or two to determine what the important bits are. Your students can speak more to a problem, and they all have slightly different info. You could spend some time having them share with a partner and filling in gaps of notes they might have, or you could just move onto interpreting some Data. (Do you like my way of suggesting lessons without suggesting? Next big mystery writer here!) So let’s talk Interpretation.

Interpretation is all about perspective and putting together facts to make an educated guess. Really this just means focusing on a very specific aspect of this problem you’ve been researching. Why? Because when a problem is too large, we come up with garbage solutions. There is never a silver bullet to most problems, and so, we must limit the vision and scope of our project.
Instead of “Insulin shots hurt” we can choose a specific user, and a specific insight from our research - “How might we: aid children, over the age of 9, in learning to self administer insulin, when many are afraid of needles and don’t want to watch it go in the skin.” Now we have a goal in sight and it gives us some clues. Phrasing is a big deal here!
Here’s another example that I love to do with people new to DT. I give slips of paper to groups - one will say something like “Redesign a better alarm clock” and another will say “Design a way to wake up feeling refreshed and excited for the day.” If you think these sound like a similar prompt, you would be blown away by the differences in the solutions. The first leads to, can you guess it? Alarm clocks! Whoa, never would have guessed! Using the word "alarm clock" in the problem already put an idea into somebody’s head. It’s hard for them to step back and say “Wait, do we really need an alarm clock?”
This is a constant struggle for designers and project managers working with clients. The client is always right, but often has a vision for what they want. It is our job to nudge them in different directions sometimes. The second, and better phrasing, leaves the door open to solutions, but is specific in that it’s asking for morning and refreshment. With this prompt, I’ve seen everything from stand-up showers with TV walls showing beautiful vistas, to warm cookies preheated downstairs to enjoy.
If you want more education lingo (who doesn’t?!) this would be equivalent to the differences in Problem-Based Learning vs Project-Based Learning. It took me forever to learn the differences and, honestly, I had to look at them again for this article. But the idea is that Problem-Based learning is a very general process where students and teachers decide together on outcomes without following a set procedure. Project-Based Learning on the other hand is akin to giving students instructions for putting together a Lego kit - they know what the end product is supposed to look like. Not a bad approach. But for DT, you must embrace Problem-Based Learning in all of it’s nebulousness.
Encourage your students to practice phrasing a problem. Aside from it being a great exercise in critical thinking, they’re learning the life skill of summing up a bunch of emotions, research, knowledge, and assumptions into a short, precise statement.
Don’t let the length of this article fool you, DT does not require you to analyze every word under a microscope. But it gives you the freedom to do so if you want to. I will warn you of potential pitfalls though:
- Unfortunately, most high school students aren’t great at the interviewing part of DT. I have realized that the investment of time in learning and practicing doesn’t result in strong outcomes for high schoolers.
- The role of the educator/mentor/project manager is more important than ever here. You have to be constantly roaming the room and asking questions. Check in with each student or group at least twice a class. Otherwise they may end up way off base.
- I can give great expert advice on assistive devices because I studied them. A little expert knowledge helps - so research ahead of time!
- Remember that this is new for most students. Use tools like ThinkPairShare to force them to pause and process.
- Make it FUN. Do silly prompts, encourage them to get it wrong. Only then can they see why.
Again, you can make this as short or as long as you want. A huge help to students is finding a few key articles that they can start with. This also reduces the amount of research time required.
Please feel free to write me with any questions you have! In my next post, I can’t wait to share how a special team and I flexed our Design skills in a recent college level hackathon to win the entire thing!
getting started, Guest Post, helpful information