
In the first installment of this short series on data logging with the micro:bit we looked at how to use the SparkFun OpenLog to log data to a microSD card over a longer period of time. The OpenLog is a great tool for doing that; creating a project that logs data every couple of minutes and let the program run for hours or days. But, what about looking at data real time? In this post we will explore using serial data once again, but this time sending it to your computer through your USB cable.
Serial Redirect

In the previous post, we used the serial blocks to send data over pin 0 to the OpenLog. For this project, we need to redirect that serial data to the USB Port. We do this by using the Serial Redirect to USB block and we place it in the On Start event. This will redirect any Serial functions to USB rather than a pin.
Collecting Data

Now that the Serial data is redirected to the USB cable we need to collect some data and send it! In the forever event loop we read the light value using the light sensor built into the LED array on the micro:bit, which we access through the Input called light level, and then turn that into a string using the join block trick (see the first blog post for more on this) to send that value as a line over the serial UART with no delay to get as accurate and responsive data as possible using the serial write line block. Perfect! Go ahead and save and upload that program to your micro:bit. But wait… the micro:bit doesn't seem to be doing anything?!
Viewing the Data
OK, you are now confused as to what your micro:bit is actually doing. The micro:bit is reading the light value of the room you are in and sending that value as a number over the USB cable to the computer or Chromebook that you are programming on. What we have to do now is figure out how to view that data and capture it.

There are a number of tools out there to allow you to view and interact with devices that are talking serial to your computer. For this application with the micro:bit, we looked for something that would work on both full blown operating systems (Mac OS and Windows), but also on Chromebooks that you find in the classroom in the form of a chrome app. Enter the Chrome Serial Monitor App.
You can search for “Serial Monitor” in the chrome app store or navigate directly to the app here.
This app is incredibly simple, but a powerful tool for doing precisely what we are trying to do. Once you have installed the app, go ahead and open it. There are two drop down menus for you to pick a few things. The first option is your serial port, there should be only one option here, but if there are multiple, try the options below.
- Windows Machine… pick your highest COM Port
- Mac the micro:bit is a dev/tty device with a few random numbers at the end
- Chromebook… see #2
Once you have selected the port, it is time to select the baud rate that the device is communicating at. For the micro:bit over USB this number is 115200. It is not super clear in any documentation, we had to figure this out for ourselves. Now you know.
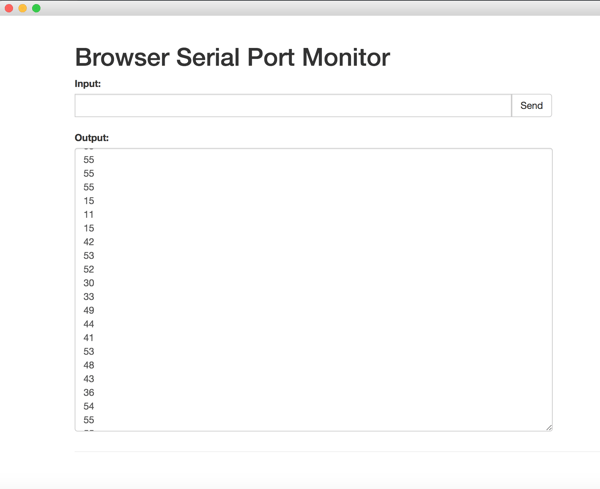
Now that you have selected both the serial port and baud rate you can now click the Connect button. If everything is working properly, you should start seeing numbers list out in the field below the drop-down menus. This is your light sensor data. Place your hand over the micro:bit's LED array and see the value drop. Once you let this run for a bit of time you can then copy and paste these values from the window into a .csv file, or directly into a spreadsheet program of your choice.
Boom, you have data.
Going the Distance
OK, many of you may not be impressed. You may be thinking to yourself…"Yeah, but now I am tethered to the computer via a USB cable…not cool!”
But wait, there's more!
If you have two micro:bits on hand, you can leverage the Radio functionality of the micro:bits combined with USB serial by turning one of the micro:bits into a base station for a remote wireless logger somewhere out in the field.
Programming the Base Station

First off, let’s write the program for the base station. It should look somewhat familiar to you with some small changes. In your On Start event we have our serial redirect to USB block and we radio set group to 1. We need to make sure that we set the radio group value to the same number on both micro:bits otherwise they will not talk/listen to one another.
We then add an On Radio Received number event block. This function will happen any time that the radio receives a number from the other micro:bit. In this function we use the serial write line block with that same setup we used before with the join block, but instead of the light value, we grabbed the receivedNumber variable from the variable drawer. So, anytime a number is received over the radio, the base station turns that number into a string and sends that over USB to the chrome Serial Monitor app.

As with the base station, we radio set group to the same number as we used before.
Note: if you are using this in the classroom your students will need to work out their radio groups in pairs, or you can assign them.
Not working!?
In the forever event, we use the radio send number block to send the light level over the radio and then use a pause block to wait 200 milliseconds before repeating again. Pretty simple! Once you save this program to your second micro:bit and power both up (making sure that the base station is connected to the chrome Serial Monitor app) you should start to see data populating in the app which is the light level of the remote / mobile unit. If you don’t get data try these tricks:
- Double check the connection, port and baud rate of your base station. This is a common error even for seasoned vets of serial devices.
- Double check your radio group and/or make sure someone else is not on the same group as you. Getting odd numbers? This is probably the issue.
- When all else fails reinstall your programs to your base station and your remote unit.
With that, I want to bid you adieu and happy data logging! If you have any ideas, questions or comments please use the comments area for this post to ask, I would be happy to help you out with using this technique in the classroom!
micro:bit, programming, microcontroller, helpful information