For past several months, our team at Wonderful Idea Co. have been developing a series of playful workshops that allow learners to explore coding, robotics and computational thinking. Many of these experiments have centered around using the micro:bit paired with the SparkFun moto:bit shield and DAGU hobby gearmotors as tools that learners can use to express their own ideas through tinkering.
Learning Through Tinkering
Wonderful Idea Co. co-founder Nicole Cartrett and I previously spent about ten years working at the Tinkering Studio at the Exploratorium creating environments and activities that combine art, science and technology in playful ways. In many of the workshops in this drop-in museum environment, learners experiment with natural phenomenon like motions and mechanisms, electrical circuits, light and shadow and wind and aerodynamics. As part of a team of educators and designers, we developed examples of learning through tinkering characterized by a great deal of fun, collaboration, iteration and experimentation.

Computation and coding can also be explored through the process of tinkering. We’re inspired by thinkers like Marina Bers, a professor of education at Tufts University who describes the idea of a coding as a playground - a place where "young children create their own projects to communicate ideas and express who they are. They explore powerful ideas from computer science and engineering, they engage in problem solving and storytelling; they develop sequencing skills and algorithmic thinking.” This idea of a coding playground emphasizes a wide range of STEAM content and practices, but more importantly, grounds these explorations in learners own ideas and projects.
While there are plenty of kits that provide an all-inclusive, introduction to coding and robotics, these high tech tools can function as closed sets and it’s often hard to understand what’s happening inside the black box of the plastic shell. For our projects, we’re trying to use a mix of familiar materials and commonly found electronic components. We hope to lower the bar for entry and create more possibilities for learners to expand their projects with bulk components, everyday materials or even parts scrounged from dissected electronics.

When robots are made with scrap wood and cardboard, learners can quickly and easily add parts, remove elements and customize their creations. Using low cost and friendly materials allows learners to start out with something approachable and less intimidating.
Wide Walled Projects
We’re interesting in developing activities that have what Mitchel Resnick, the leader of Lifelong Kindergarten group at MIT Media Lab, calls "wide walls." Resnick writes, “if we see a wide variety of projects, we take it as an indication that everyone had an opportunity to follow their own interests and become deeply engaged.” This idea leads us away from traditional design challenges or engineering focused prompts like creating the fastest car or designing a battle ready robot. We feel that these competitive projects constrain the possibilities and offer less opportunities for learners to explore wide walls.
We prefer more collaborative coding projects like creating a computational zoo or a light-up underwater world. These provocations offer many pathways through the activity and ways for learners to express their own ideas through art and design. Instead of just creating solutions to challenges, they are posing their own problems like how to make an LED jellyfish pulse rhythmically or get the tongue of a dragon to stick out threateningly when someone gets too close.

Approaching Hardware
For many of these prototype computational activities, we’ve focused on the micro:bit microcontroller paired with Sparkfun moto:bit shield and geared down hobby motors. The micro:bit is a compact and friendly microcontroller with many features designed with education in mind. The on-board buttons, light sensor, digital display and accelerometer give the board lots of possibilities to explore inputs and outputs even before connecting other components. We’re coding the micro:bit with the Microsoft Make:code block-based programming language.
For both analog and digital tinkering activities, we’re using little yellow DAGU gearbox motors because they are cheap, sturdy and flexible. These motors work great for classic tinkering activities like light play, circuit boards and chain reactions. The combination of the fast spinning shaft for an offset weight and the two slower moving hubs offers lots of possibilities for different types of movement.

As a way to encourage more experimentation, we fabricated a bunch of laser cut shapes with a keyhole that press fits on the hubs. These varied shapes allow for surprising results and are more customizable than the standard wheels with the rubber tires that can be bought with the motors.
The moto:bit shield brings these components together in an easy to understand package. Once you snap the moto:bit and micro:bit together, it makes it really easy to connect and control the gear box motors. With the addition of standard mini servo motors and bulk sensors, all the element are there to get started with playful robotics.
Creating Unique Robots
When we started to explore these three components, we checked out the SparkFun guides. These step-by-step instructions provided a good introduction to the possibilities for creating robots with these elements, but we wanted to move beyond these initial designs to build scrappy, unique contraptions.

We started with the idea of creating drawing machines based on LOGO turtles first imagined by Seymour Papert, who pioneered the constructionist approach to education that permeates all of these experiments.
Previously, I built a version of the LOGO turtle that inspiring creative coding educators Josh Burker, Brian Silverman and Eric Nauman adapted from this arduino turtle guide that used a 3D printed chassis. His version of the robot has the ability to create really accurate drawings and allows for creativity and experimentation when it’s built. But each one of the machines looks the same. We wondered if we could sacrifice some of the precision of his LogoTurtle to focus on the tinkering process both in the design of the robot and the outcome of the patterns that it draws.
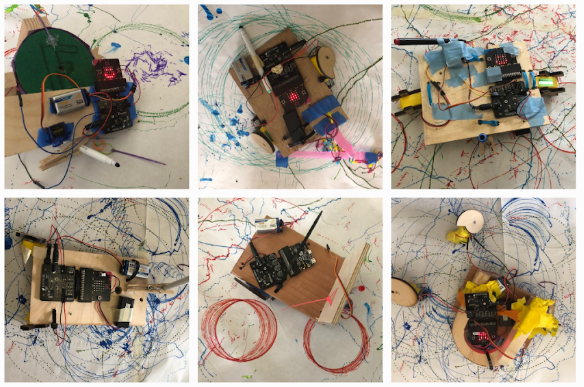
We thought about Papert’s quote in Mindstorms, that “many children are held back in their learning because they have a model of learning in which you have either ‘got it’ or ‘got it wrong.’ But when you program a computer you almost never get it right the first time.” With this in mind we started experimenting with off-balance, kluged-together drawing machines that used micro:bit and moto:bit to produce unique patterns. We thought that these scrappy designs could help learners feel more comfortable making mistakes and trying out wild ideas.
Iterating Ideas
We tried this activity in our “computational creatures” summer camp this year. In this week-long program, we started with traditional scribbling machines built with batteries and hobby motors with an offset weight to make vibrating motion.

The next day, we led a quick introduction to how to program the micro:bit and attach gear motors to the moto:bit. After about an hour of messing about with just the bare components, we introduced wood, cardboard, zip-ties, hot glue and other craft materials and showed a couple examples of what we dubbed “twisted turtles”.

Each group went back and forth between physically building their machine and adjusting the code to create different motions. As learners changed the direction of the motor and the speed, the machines responded with many different motions. The micro:bit/moto:bit set up allowed for quick prototyping and adjustment. After learners got the DAGU motors rolling, many tried adding a servo to control the “pen up” and “pen down” function.

At the end of the session we encouraged all the campers to add their bots to a big piece of white paper that we laid out on the ground to produce some beautiful modern art.
Educators as Learners
We also tried this same activity with a group of museum educators, teachers, librarians and researchers at our Creative Coding professional development workshop in August. We found that adults deeply engaged with this workshops and experimented with unique and whimsical ideas.
We were surprised and delighted by the variety of concepts that the groups explored, from a repeating flower design to an expanding spiral to a fire fighting machine that eschewed drawing and instead used the screen to spell out Shakespearean quotes.

We believe educators need to spend the time to try out activities and experiment with the materials as learners. This gives familiarity with the components but also builds an understanding of all the things that might go wrong. During the workshop, a pair of teachers got super frustrated when their machine wasn’t working, they couldn’t upload the code and nothing seemed to be going as planned. We suggested that they check everything and after a couple minutes they realized that the micro:bit was connected to the moto:bit upside down. These types of mistakes are very common for students and it’s important that educators give enough time and flexibility to troubleshoot and debug issues big and small.

Learning Designers
As learning designers we are also continuously trying new experiments. We’ve been testing out micro:bit and moto:bit parts for our own exhibits and artistic installations. Nicole recently created a bubble blowing robot based on an arduino powered machine shared by Zitka Markfeld in a past issue of MAKE magazine. Our machine featured scrap wood, chopstick arms and a tupperware case for the micro:bit. These types of exhibits encourage curiosity from kids and adults who might be interested in these technologies but not sure where to start.
And we’ve continued messing about with these three elements (moto:bit, micro:bit and DAGU motors) to design workshops for more future camps and classes. A few of the activities that we think have a lot of potential are connecting the motors to cardboard automata, programming elements in rube goldberg style chain reaction machine and building amphibious vehicles inspired by the AVAM kinetic sculpture race. Possibilities for micro:bit and moto:bit activities are endless and we’re always borrowing ideas and learning from other educators who are prototyping with these same materials.
As we continue exploring these types of creative coding projects, we’ll be offering opportunities for educators to engage with these ideas as learners, reflect on their process and then remix ideas in professional development workshops. Follow the WICO blog and social media accounts for the latest updates about our micro:bit and moto:bit prototypes.
Maker Education, Guest Post, micro:bit, microcontroller, STEAM