.jpg)
Editor's note: We're excited to bring you this series of guest posts from Shane Diller. Read on to learn more about Shane and how he uses electronics in schools.
If you read my last post, you hopefully took away a couple of key points:
- I make really bad jokes
- I want to offer what’s worked for me so far in the hopes that it may help other teachers who want to infuse their class with some meaningful coding/making.
If you didn’t take away any of that, please let me know as I need to tell my high school English teacher that she was right, my writing is awful and I owe her 10 bucks.
This post is going to introduce how I use Arduino in my class. I’ll cover how I teach it in the next post and give you a ton of resources, but a lot of you may have your own way and I don’t wanna tell you how to do your respective “thang.” So, my class mostly focuses on entrepreneurial studies and how design and innovation support that. We use Design Thinking principles, SCRUM framework and more. Whether it is in my course or the special programming that I deliver, I am really more of a project manager than a teacher. Why does that matter? Well, mostly because I use Arduino and coding to support these ideals. That also means I am very hands off when it comes to coding projects. I don’t give my students or other teachers a project that says, “Follow these steps to build this thing that somebody else already has built.”
In fact, I’m vehemently opposed to these types of projects to demonstrate skill or understanding. Even showing them an end product that I want and asking them to get there is not my favorite. Part of this is personal preference, and the other part is experience. Here’s a great table that summarizes my feelings.
|
Level of project |
Amount of student learning |
| Follow step-by-step instructions |
Fleeting and temporary, like my attention span |
|
Challenge to reproduce existing project |
Did they look up a guide? If not, then some learning! |
|
Challenge to use code to bring their own idea to life |
Ding ding ding! |
Very professional, I know. Here’s a link to an example of the project that challenges them to bring their own idea to life. Look below for explanation of some of the finer details of it. Because of my background in Human Factors and Rehabilitation Engineering, this is the project I choose to give them. I can offer expert advice and experience to make up for the fact that they don’t have much. Similar to a project manager role, I’m asking my team to not be experts, but to be able to code what the client wants. Sometimes I choose to be the client as well (I own a lot of hats), and sometimes I don’t. That is typically decided by how much I want them to “check in” and get feedback.
Here is a link to the rest of the folder, including the rubric if you want to stop reading now. I promise I’ll only be slightly offended. The SCRUM framework folder is probably the weirdest to the untrained eye. SCRUM is a framework that a lot of technology companies use to organize their projects. Think of it as a time/task management tool. Graphic organizers are ancient history now. You can choose to leave this out, but you’ll have to change the rubric to reflect that. I use SCRUM to give them a bunch of mini grades on small deliverables instead of just one giant grade. That way, I’m giving them permission to take more of a risk than usual because their grade will still survive, even if they fail miserably. If you’ve been reading anything about education, another buzzphrase is “teaching failure!” which is really scary for students and not something they go toward naturally. I could do a whole separate post on that, but I’ve had enough coffee to stay on track this morning.
The rest of the post will talk about how to lead them through this project, typical pitfalls, learning outcomes and how to mix and match this to fit your class.
Introduction
This is probably the easiest part. I post the Handout, the grading rubric, the folder for them to submit their code and an example of a flowchart (for the human code part). Then I read through just the handout with them and tell them they can read the rubric on their own (client hat).

Ideation
After I read through the handout with them, it’s time for them to start ideating what device they want to use. If you have the handout open right now, you’ll see a section where I give them a bunch of different tasks that people with a visual or hearing impairment might struggle with. I make sure to tell the students that there are always varying levels and people always find a solution. Use empathy, not sympathy to ideate. And I make it clear that the student’s idea has to be better than somebody’s current solution, which is much tougher than it sounds like. I used to partner with Virginia Commonwealth University and have the students interview professors that have a lot of experience here but developmentally, students are not great at interviews (especially if you’ve done Design Thinking work), and the time investment for it would be more than a quarter of my total class time.
So, as the students ideate, we use Design Thinking rules : flare, quantity over quality, write down every idea, use constraints, don’t reject your own ideas, be silly.
Also, my favorite rule: Every idea gets its own sticky note, and they need to save sticky notes.
The point? Students are responsible for trying to think of what makes a task difficult, and what are specific “pain points” they can alleviate (pain points is industry jargon, not always actual pain). You can use the SCRUM framework task analysis to help students who might be struggling in this part. Otherwise, students are choosing their own adventure! This should be done by the end of the first class.

Getting to the Grind
To bring you back, this is supposed to be a coded device, so students are responsible for using what we learned in the Arduino unit to think through how they can prototype this device. The flowchart is great for students to write down what functions they want and break up their code into chunks they can manage and work on one at a time. And as a project manager, you can look over this flowchart to point out what parts they can grab from previous projects and where to focus their time. It's way easier than looking at a hundred lines of code and trying to help.
I give them a full class period to do this flowchart, so now we’re at two classes. It may seem like a lot, but here is the justification:
- Planning is a skill, and time management even more so. You need to give them time for this.
- I give them a lot of points for how well they plan.
For the next two class periods, it is their challenge to code this device. That seems daunting, and I do this intentionally. I don’t want a perfectly functioning device, I want a prototype. As an example, if a student wants to create a device that flashes a light and speaker when a button is pressed, they really just need to splice code from the “Blink” sketch and add in some button functionality. I don’t want eight LEDs; I don’t need it to be wireless; I don’t need it to be a nice sounding tone; I don’t need the button to turn it on and off (much tougher than it seems); I don’t need it to be connected to a battery. Being able to sort through what is important to a prototype is a skill.
The Finale
This gets its own section because you have a lot of options! In the past I’ve done project showcases with a little, two-minute presentation; I’ve done “symposiums” where students tour the room and view each other’s projects and vote on the best; I’ve made promo videos for the projects; I’ve asked students to write and film their own little commercial. You get the idea. You can take this as far as you want but I do believe it is important to do more than just having students submit their code and a 2D sketch. Also, use this time for students to do a reflection, whether written or oral. I tell them that I factor it into their grade. Even if their project is pretty rough and their code doesn’t have a lot, if they can explicitly tell me why their code didn’t work or explain what happened, I can tell that they learned a lot about code and give their grade a boost. The reflection is really where student learning is measured.
Typical Pitfalls
We’re almost there! Here are some of the most common pitfalls and roadblocks for students and how to solve them:
| Pitfall | Solution |
|
Student’s idea is FAR above their skill level |
Be real with them. Tell them that would be great for a final project, but part of the grade is on their time management and to take it down a notch. If they choose not to, let them move forward (scary, I know, but it’s a lesson). |
|
Student getting stuck in flowchart stage |
Let them do “human code” and just write down what the code is supposed to do, then break it up into sections with highlighter. |
|
Student using DC motor (hard circuit) |
Have them use a LED to represent the motor! It’s just a prototype! |
|
Student writing error-driven code (changing random things to try and fix errors) |
This is one of the toughest; you might need to step in and organize their code. But have them start adding comments after what each part should do and see if that helps. |
Grading
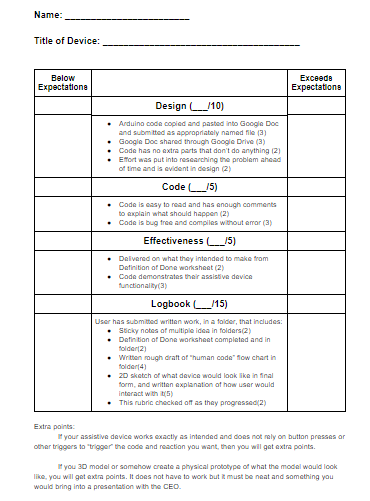
For this part, you’ll need the rubric and the initial handout open. The rubric is pretty self explanatory and helps students who typically don’t read comments unless their grade is really bad. You can just use arrows for each item to tell them if they satisfied requirements or didn’t. I go by a points-based system for my course. They can get 35 maximum points on that project, and you’ll notice that the code actually working and being effective is only 10 points. This is what I mean by it being okay for them to fail and it still not wrecking their grade. If you look at the handout, I also have two other check in dates for them. These are each worth 10 points. So in total, 55 points where only 10 are if their code works. For those struggling with how to grade projects like this, hopefully this serves as a good guide. I’m not going to pretend like I’m a rubric genius, and if you have a suggestion, please let me know!

Making it Your Own
So, you probably don’t want to do an assistive device. Here are my suggestions for making it your own:
- Use the general idea of “you need to create something to help somebody do/understand/work with __________." History class? Create a coded device that would have helped organizers during the civil rights movement, or ancient Romans, or whoever (don’t worry, I know ancient Romans didn’t have smartphones, just flip phones).
- Use the table of suggested tasks and replace them with your own that relate to your subject or unit. Science? Talk about different parts of stoichiometry or genetic replication.
- You don’t have to use Arduino for this! I do because it’s what I chose. You can use Scratch, Python, Processing, Raspberry Pi. Whatever you want!
I’m more than happy for you to email me and ask questions if this doesn’t work. Please reach out to shane.diller@gmail.com Congratulations on making it to the end! Here’s your reward. Stay tuned for how I teach Arduino.

Shane Diller is a biomedical engineer turned educator, all around turbo nerd and innovation geek. Shane is the Lead Technologist for the Bryan Innovation Lab at The Steward School in Richmond, VA. His favorite piece of hardware is the classic Arduino Uno due to the low price point and sheer variability. His favorite projects include any that can demonstrate high-level engineering concepts in an artistic and approachable way. He’s passionate about wearables, web development, human-centered design, prosthetics, mentoring and inspiring others, and sticky notes. Oh, and pictures of pugs in costumes.
teaching tools, student projects, Guest Post, helpful information