
Musical Instrument Shield Quickstart Guide
Overview
Believe it or not, the small chip on the Music Instrument Shield is capable of generating thousands of different sounds. Ever played with a Casio (or other brand) synthesizer at a department store? The VS1053 chip on the Musical Instrument Shield can make just as many sounds! You just have to know how to talk to it, which is the subject of this tutorial.
Requirments
To start working with the shield, you'll need a few things.
- Arduino Uno or Arduino board capable of using shields
- Stackable Headers
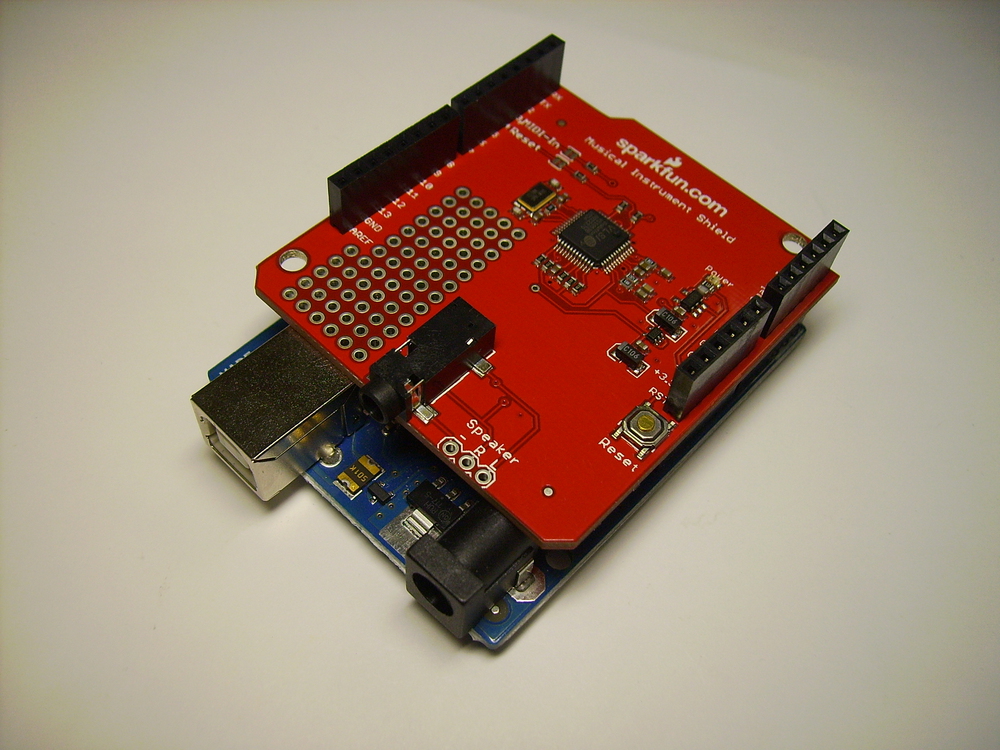
- Music Instrument Shield
- Headphones or Active Speakers with a 3.5mm (headphone-size) plug
Setting it Up
Assembly
Right out of the box, the Music Instrument shield needs a way to connect to an Arduino main board. This means soldering on some headers. If you don't know how to solder, or need a review, be sure to check out our Soldering 101 Tutorial. Once you've soldered the headers on, connect your shield to the Arduino.
Software/Firmware
The example code uses the NewSoftSerial Library. If your Arduino IDE is version 1.0 or later, you automatically have this library installed. If you have an earlier version of the IDE, you'll need to either upgrade or install the library manually.
Using the Example Code
Before we actually dig into the MIDI specification, let's get the shield making some sounds. Download the example sketch and load it into your Arduino IDE.
- Music Instrument Shield Example Sketch (Arduino 1.0 and newer)
- Music Instrument Shield Example Sketch (Arduino 0023 and older)
This example outputs some status statements to the terminal at 57600 baud. The actual MIDI statements use the NewSoftSerial library to communicate over pins 3 and 4 at 31250 baud. Once the example code is loaded onto your Arduino, plug in some headphones or active speakers to the audio jack on the shield, and reset the device. You should hear a string of seemingly random percussion sounds, kind of like an old sound-effects tape.
What's actually going on in the code? Basically, the code chooses a "bank" of instruments, and then plays all the "notes" in that bank, one after the other. In this case, we have selected a sound effects bank, and the individual notes correspond to each different sound, even though they don't follow any set scale, like the keys on a piano. To start working with different instruments, we'll need to learn a little bit more about the MIDI protocol.
Simple MIDI and the Example Code
Everything we do in this section is thoroughly explained in, and sourced from, these two documents:
The MIDI Protocol is essentially a serial protocol with a set byte order. MIDI messages consist of one, two, or three bytes, and some messages are more common than others. Many different types of information can be conveyed in MIDI messages, from turning notes on and off to sending system-level manufacturer information. If you've never worked with MIDI before, this will seem daunting and you may not understand it right away. For a full run-down of MIDI, please read the MIDI Specification Tutorial linked at the top of this section.
Take a look at the example sketch. In the setup function, the Arduino toggles the MIDI Reset line to start using the device in a known state. In the loop function, there are three test loops, two of which are commented out. Take a look at the loop that is not commented out. The first function call to note is this:
talkMIDI(0xB0, 0, 0x78);
This is a general example of a MIDI message with three bytes. The first byte, 0xB0, indicates that this message is a "control change" message. The second byte, 0, indicates that we would like to change the "controller" with the value of zero. There are 127 "controllers," and the controller with the value of 0 is "Bank Select," meaning that the next value, 0x78, is the "bank" of instruments we are selecting. In this case, 0x78 refers to the percussion bank.
The next MIDI message to look at in the loop is:
talkMIDI(0xC0, instrument, 0);
The first byte, 0xC0, indicates that this is a Program Change instruction on MIDI channel 0 (confused yet?). The Program Change instruction essentially means that we are telling the chip to point to a certain set of instrument samples within the "bank" that we selected with the last instruction. The "instrument" variable in this function call is the particular set of instrument samples that we want to load. In order to change to a different instrument in the bank, we would change the "instrument" variable. In the case of the example code, we know that "instrument" has the value of 30. To add to the confusion, however, the bank we selected has only one instrument, so it really doesn't matter what the value of the instrument is. This function call is needed to set the MIDI channel on which we want to play. This is discussed on page 30 of the VS1053 datasheet.
By this point you should be thoroughly confused and frustrated. Let's look at a table of the "instruments" that we're actually dealing with. Below is a table of the "notes" that are included in the bank that we selected with the first MIDI instruction.
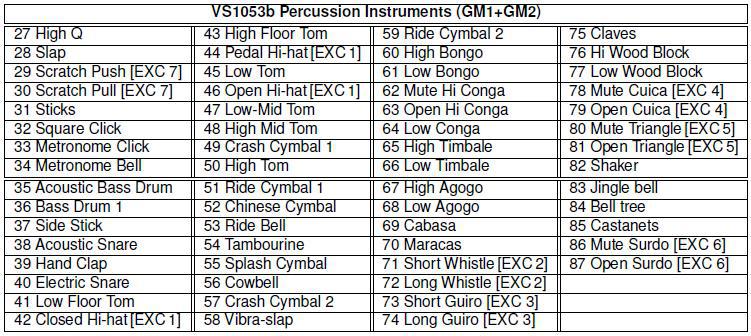
There are sixty "notes" that can be played in this bank, with values from 27 to 87. In order to "play" a note, we need to send the Note On command with the value of the note we want to play. This is the next MIDI instruction in the example code:
noteOn(0, note, 60);
The noteOn(...) function is a function that sends the MIDI instruction to turn on a note. It varies slightly from the noteOff(..) function, but both functions are used often enough that it is useful to have separate functions. The first parameter, 0, in this function call is which MIDI channel we want to play. Since we initialized our instrument on channel 0 with the last instruction, we'll play on that. The next parameter is the actual note that we want to play. This value corresponds to the values in the bank table above. In the example code we're looping the note value from 27 to 87, playing all the notes just once. The last value is called "velocity." It is an indication of how "forcefully" the note should be played. If it is a low number, the note will be played lightly, if it is a high number, the instrument will be played louder and more forcefully. Think of velocity as how hard you hit the keys on a piano. If it is hit lightly, you get a note with light velocity. If it is hit forcefully, the note is loud and percussive.
After the noteOn() call, there is a delay of 50 milliseconds. This means that whatever note we chose will play for 50 milliseconds. After the delay, we have to tell the chip to turn the note off. Hence, the noteOff() function call:
noteOff(0, note, 60);
This function call is the exact opposite of noteOn(), with the exception that the third parameter is called "release velocity." Release velocity is a bit difficult to understand, so in our case we keep it the same as the noteOn velocity. Please read the MIDI Specification tutorial linked at the top of this section.
This loop continues to cycle through the values in the percussion bank, playing one note at a time. Play with the values of the bank and instruments to get more sounds. Note that the bank values are as follows:
- Bank 0x78 is the percussive instruments
- Bank 0x79 is the melodic instruments (note: with melodic instruments, you must select the instrument number, not just the note number)
The MIDI section of the VS1053 datasheet starts on page 30. It contains all the values for the banks and instruments. MIDI is a complex protocol, and difficult to understand at first, so be sure to read through the MIDI Specification tutorial at the top of this section.
Resources
- Full MIDI Specification Tutorial
- VS1053 Datasheet
- Music Instrument Shield Example Sketch
- Wikipedia article on MIDI
Conclusion
Best of luck, and have fun making noise! If you have any problems, feel free to contact SparkFun Technical Support at techsupport@sparkfun.com
Just in case anyone else is confused about the instrument numbers listed in the VS1053 datasheet, you have to subtract one from the number listed in the table when you send the MIDI command. The instrument numbers in the table go from 1-128, but the command needs a value from 0-127.
Soldering the pins was easy. Pushing the shield onto the Arduino board was a challenge but i did it. After a bit of fuss, I got the code to work. Those sounds are truly awesome! Great work, folks!
Regarding documentation, where can I find documented the Bank number for Percussive Instruments (0x78)? I've searched the VS1053b documentation as well as the web, but can't find it.
I know it works, but for reference I'd just know where I can find it documented. Thanks!
here is the talkMIDI function I use with Arduino 1.0.2:
https://gist.github.com/4385276
I get the following errors when trying to run the first example sketch. I am running Arduino UNO and Arduino 1.0.2 IDE. Can someone point me in the right direction. The only thing I have run on the UNO is the blink sketch.
MusicIntrument_Example:35: error: 'NewSoftSerial' does not name a type MusicIntrument_Example.pde: In function 'void setup()': MusicIntrument_Example:46: error: 'mySerial' was not declared in this scope MusicIntrument_Example.pde: In function 'void talkMIDI(byte, byte, byte)': MusicIntrument_Example:171: error: 'mySerial' was not declared in this scope MusicIntrument_Example:171: error: 'BYTE' was not declared in this scope
As of Arduino 1.0, the 'BYTE' keyword is no longer supported. Please use Serial.write() instead.
My Arduino IDE is version 1.0.1. It did not come with Newsoftserial, just Softwareserial. When I try to compile the example code, I get a whole bunch of errors, including "as of version 1.0, the BYTE keyword is no longer supported". Please help anybody.
Did you get this to work? I just figured it out if you're still looking for help.
Great tutorial! but how many kilobytes roughly can it hold of sounds?